React Native 는 프로젝트 구성 및 효과적인 폴더 구성은은 어떤 방법들이 있을 지 알아보려 한다. 


dream$ npx react-native init folderStructure

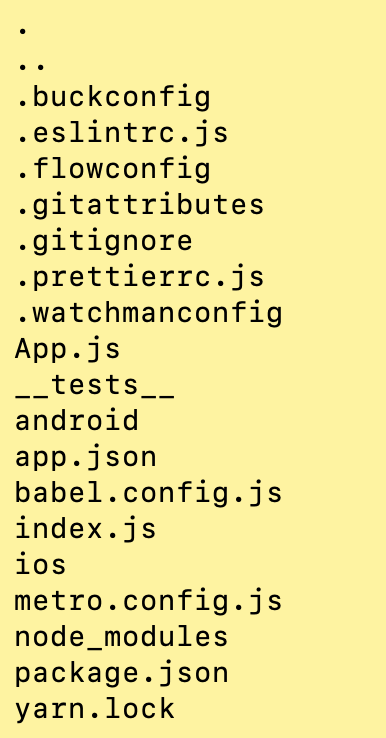
좌측의 이미지는 React Native를 이용해 처음으로 생성한 폴더&파일이다. 


효과적인 폴더 구성을 알아보기 위해서 기본적으로 생성되는 폴더와 파일에 대해서 알아보겠다. 


index.js : react native app이 실행될 때, 진입점이 된다.

App.js : App이 로딩 되었을 때 개발자에 의해 개발되어 표시되는 최초화면이다. index.js 파일에서 import하여 App의 진입화면으로 사용한다.

App.json : RunTime 시점에 자바스크립트 코드를 이용해서 접근할 수 있다. 

ios : IOS를 기동하기 위한 프로젝트 폴더이다.

android : Android를 기동하기 위한 프로젝트 폴더이다. 

babel.config.js - React Native Application 을 위한 Preset 설정

metro.config.js - Metro Bundler 설정 파일

node_modules - node module이 저장되는 폴더  

package.json - node modules 종속성 관리 설정 파일 


React Native 를 활용해서 모바일 App을 만들때 가장 고민되었던 부분이 폴더 구성이었다. 

관련 자료과 내가 구성한 방식들을 고민해봤을 때, 어떤 방식으로 구성하는 것이 가장 효율적이냐에 대한 부분은 정답이 없다는 생각이 들었다. 


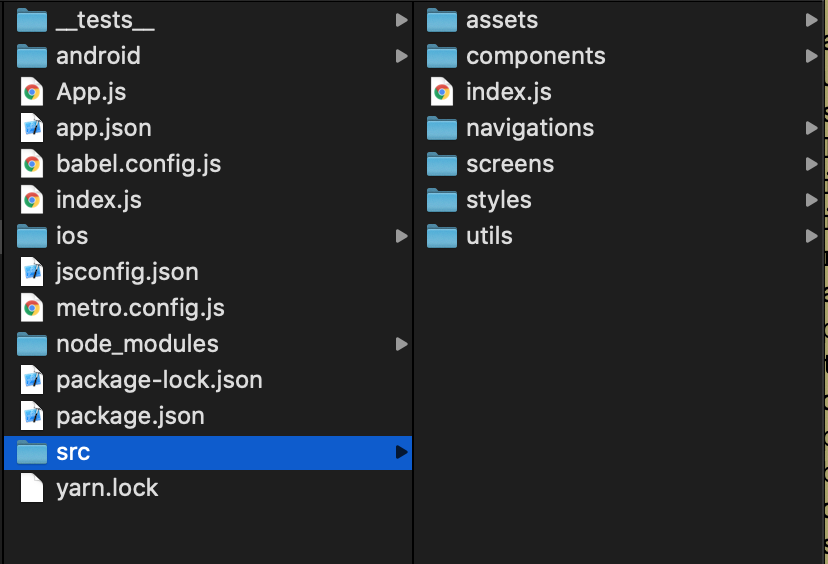
다만, 다수의 React Native 폴더를 보았을 때는 아래와 같이 구성하는 것이 가장 적합한 것 같았고, 오히려 폴더의 구성 보다 React Native Component 상에서 각각의 폴더 내의 Component들을 가져오는 방식이 더 중요하다고 생각한다.


폴더의 구성 방식은 아래와 같이 구성해봤다.


src 폴더 구성

위의 폴더 구성을 바탕으로 필요한 Component 를 Import 할 때, 


 이전에는 아래와 같이 했다면,


import { DataBase, DataBaseWrite } from '../../../components/database';


아래와 같이 조정해봤다.


import { DataBase, DataBaseWrite } from '_components/database';


위와 같이 처리한 이유는 ../../../은 가독성이 유지보수 측면에서 최악이라고 생각했기 때문에 이를 _components 라는 alias를 대신해서 사용한 것이다.


1. Package.json에 아래 항목 추가 


"babel-plugin-module-resolver": "^4.0.0",

"eslint-import-resolver-babel-module": "^5.1.0",

"eslint-plugin-import": "^2.19.1",


2. 아래의 빨간색으로 표시한 항목에 대해서 파일 추가 또는 내용 추가 


react-native init {프로젝트 명} 로 생성한 프로젝트 폴더 경로 안에 아래의 빨간색 표시 박스의 파일을 수정 또는 추가한다. 


아래에 설정된 폴더의 경로는 자신이 구성한 프로젝트 폴더의 구성에 따라 변경하여 사용하면 된다. 
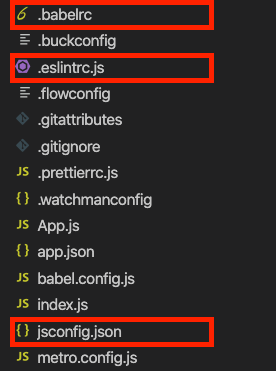
 

추가된 파일 


3. .babelrc 파일 추가

babel-plugin-module-resolver를 설치하고 난 뒤에 .babelrc 파일에 아래와 같이 설정하면 alias를 절대경로로 사용할 수 있다.

root를 사용하면, 내가 원하는 src 폴더에 대해서 프로젝트 root 를 지정할 수 있고, 위에서 봤던 이미지 처럼 


 _components/database 와 같이 ../../../ 을 사용하지 않고 직관적으로 이해할 수 있게 경로 설정이 가능하다. 이는 폴더의 depth가 깊어지기 시작하면 정말 필요해진다. 

{
	"plugins": [
		[
			"module-resolver",
			{
				"cwd": "babelrc",
				"root": ["./src"],
				"extensions":[".js",".ios.js",".android.js"],
				"alias": {
					"_assets":"./src/assets",
					"_components":"./src/components",
					"_atoms":"./src/components/atoms",
					"_molecules":"./src/components/molecules",
					"_organisms":"./src/components/organisms",
					"_navigations":"./src/navigations",
					"_scenes":"./src/screens",
					"_services":"./src/services",
					"_styles":"./src/styles",
					"_utils":"./src/utils"
				}
			}
		]
	]
}


4. jsconfig.json

Visual Studio Code의 코드 인텔리센스를 위해서 프로젝트 디렉터리에 jsconfig.json 파일을 만든다. 

이는 npm plugin을 통해서 babel-plugin-module-resolver를 import 하여 사용하는 것이기 때문에, VS Code에서 import 시에 

지정한 alias에 맞게 작업시 파일을 불러오지 못하는 경우가 생기는데, 이 경우에 해당 파일슬 생성하여 alias에 맞게 자동완성 기능을

적용할 수 있다.

{
	"compilerOptions": {
		"baseUrl":".",
		"paths": {
			"_assets":["src/assets/*"],
			"_components":["src/components/*"],
			"_atoms":["src/components/atoms/*"],
			"_molecules":["src/components/molecules/*"],
			"_organisms":["src/components/organisms/*"],
			"_navigations":["src/navigations/*"],
			"_scenes":["src/screens/*"],
			"_services":["src/services/*"],
			"_styles":["src/styles/*"],
			"_utils":["src/utils/*"]
		}
	}
}


5. .eslintrc.js

eslint가 설정되어 있는 경우에는 eslint에서 사용하는 소스 코드의 경로 상의 문제를 해결하기 위해서 아래와 같이 alias를 지정한다. 

module.exports = {
  root: true,
  extends: '@react-native-community',
    plugins: ['import'],
    settings: {
      'import/resolver': {
        node: {
          paths: ['src'],
          alias: {
            _assets: './src/assets',
            _components: './src/components',
            _atoms: './src/components/atoms',
            _molecules: './src/components/molecules',
            _organisms: './src/components/organisms',
            _navigations: './src/navigations',
            _scenes: './src/screens',
            _services: './src/services',
            _styles: './src/styles',
            _utils: './src/utils',
          },
        },
      },
    },
};


'따라해보기' 카테고리의 다른 글

0001 React Native App 개발기 6-3  (0) 2019.12.13
0001 React Native App 개발기 6-2  (0) 2019.12.13
0001 React Native App 개발기 6-1  (0) 2019.12.12
0001 React Native App 개발기 5  (0) 2019.12.08
0001 React Native App 개발기 4  (0) 2019.11.22

지난 편(React Native App 개발기 6-1)에서 알아본 컴포넌트 생명주기에 대해서 코드로 알아보려 한다. 


 아래의 설명한 사항은 React Version 16.4를 기준으로 동작하는 함수 및 절차이다. 


React Native 메인  

메인 화면 ( 클릭버튼 ) 

 - Component의 생명 주기를 알아보기 위해서 Main Component를 Import하여 아래와 같이 사용하였다. 

 - React Hook의 useState를 이용해서 함수 내에서 state를 사용하여 상태를 Main Component로 전달하였다. 

/**
 * Sample React Native App
 * https://github.com/facebook/react-native
 *
 * @format
 * @flow
 */

import React, { useState } from 'react';
import { View,  Text, Button } from 'react-native';
import Main from './src/pages/Main';
import ErrorBoundary from './src/pages/Error'

const App = () => {

  const [ value, setValue ] = useState({ data : "" });

  const onPressEvent = () => {
    setValue({ data : "11" });
  }


  return (
    <>
      <ErrorBoundary>
        <View style={{ flex : 1, justifyContent : 'center', alignItems:'center' }} >
          <Text>Component Life Cycle 입니다.</Text>
          <Button title="클릭" onPress={onPressEvent} ></Button>
        </View>
        <Main stateProps={value} propsData={11} />
      </ErrorBoundary>
    </>
  );
};

export default App;


React Native ErrorBoundary

import React, { Component } from 'react';


class ErrorBoundary extends Component {
    constructor(props) {
      super(props);
    }

    static getDerivedStateFromError(){
        console.log("getDerivedStateFromError");
    }
  
    render() {
      return this.props.children;
    }
}

export default ErrorBoundary;


React Native Main


 - Component Lifecycle에 활용되는 모든 함수를 아래와 같이 정의하여 Component 호출 시점, Props 전달 시점, State 전달 시점을 알아보려한다.  

 - 각각의 함수에 console.log를 추가하여 호출 시점을 알아보겠다.

import React, { Component } from 'react';
import {
  View,
  Text,
} from 'react-native';

class Main extends Component{
    constructor(props){
        super(props);

        console.log("constructor");
    }

    static getDerivedStateFromProps(props, state){
        console.log("getDerivedStateFromProps") ;  
    }

    shouldComponentUpdate(nextProps, nextState){
        console.log("shouldComponentUpdate");
    }

    getSnapshotBeforeUpdate(prevProps, prevState){
        console.log("getSnapshotBeforUpdate");
    }

    componentDidMount(){
        console.log("componentDidMount");
    }
    
    componentWillUnmount(){
    	console.log("componentWillUnmount");
    }

    render(){
        return (
            <View style={{flex : 1, justifyContent : 'center', alignItems:'center' }} >
                <Text>Component 입니다.</Text>
            </View>
        )
    }
}

export default Main;

 - 메인화면이 호출될 때, ( command + R 을 눌러 메인화면을 새로고침 했다. )

메인화면 로딩시


호출 순서 : constructor -> getDerivedStateFromProps -> componentDidMount 


 - 메인화면에서 버튼을 클릭했을 때, ( React Hook을 이용해 state를 component로 전달했다. )

버튼 클릭 시


 호출 순서 : getDerivedStateFromProps -> shouldComponentUpdate 


 - 메인화면에서 다른 화면으로 전환될 때


 호출 순서 : componentWillUnmount 


 - ErrorBoundary를 감싸고 있는 하위 컴포넌트에서 에러가 발생했을 때, 


 호출 순서 : getDerivedStateFromError


Mounting에서 부터 Unmounting 까지의 절차는 아래의 Link에서 가져온 이미지에서 잘 정리되어 있었다. 

http://projects.wojtekmaj.pl/react-lifecycle-methods-diagram/


다음편에서 16.3 기점으로 나뉜 컴포넌트 생명주기 함수들에 대해서 자세히 설명할 예정이다. 

'따라해보기' 카테고리의 다른 글

0001 React Native App 개발기 7  (0) 2019.12.14
0001 React Native App 개발기 6-3  (0) 2019.12.13
0001 React Native App 개발기 6-1  (0) 2019.12.12
0001 React Native App 개발기 5  (0) 2019.12.08
0001 React Native App 개발기 4  (0) 2019.11.22

+ Recent posts