Reactive Programming은 선언적인 프로그래밍 패러다임으로써 데이터 스트림(Data Stream)과 변화의 전파에 초점을 맞추고 있다. 또한 이것의 핵심은  비동기 (Async) 이벤트와 Observer 디자인 패턴이다. 외부의 이벤트나 데이터가 발생하였을 때, 사용자에게 자연스러운 응답을 주고, 규모 탄력적으로 리소스를 사용하며 실패에 있어서 유연하게 대처할 수 있다. 


 Reactive Stream은 Reactive Programming을 근간으로 한 개발을 하기 위한 명세이며, Netflix, Pivotal, TypeSafe의 발의로 시작되었다. 


Reactive Streams : https://www.reactive-streams.org/


 Reactive Stream은 비동기적인 스트림 프로세싱을 막힘없이 ( Non Blocking) 처리하기 위한 하나의 표준이다. 


Reactive Stream의 상세 스펙 보기


기본적인 API 컴포넌트 구성 


  1. Publisher
  2. Subscriber
  3. Subscription
  4. Processor

코드로 작성된 추상화 수준으로 확인을 해보면, 

// Publisher
public interface Publisher<T> {
    public void subscribe(Subscriber<? super T> s);
}

// Subscriber
public interface Subscriber<T> {
    public void onSubscribe(Subscription s);
    public void onNext(T t);
    public void onError(Throwable t);
    public void onComplete();
}

// Subscription
public interface Subscription {
    public void request(long n);
    public void cancel();
}

// Processor
public interface Processor<T, R> extends Subscriber<T>, Publisher<R> {
}


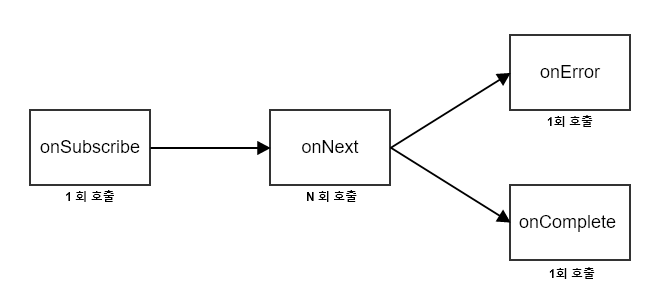
위의 코드에서 Subscriber의 역할에 대해서 아래의 그림으로 확인해보면, 


Subscriber 의 동작흐름


Publisher,  Subscriber, Subscription 사이의 연관관계를 아래와 같이 구성해봤다.


Reactive Stream 구성


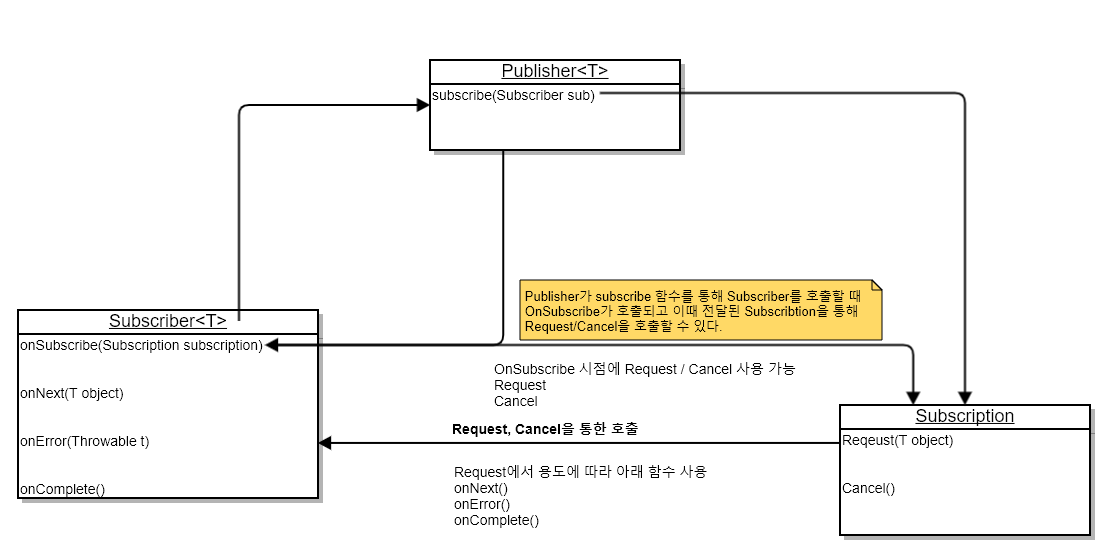
실제로 위의 구성 관계를 이용해서 코드를 작성해보면, 아래와 같이 작성해볼 수 있다. 


package com.reactive.reactive.basic11;

import org.reactivestreams.Publisher;
import org.reactivestreams.Subscriber;
import org.reactivestreams.Subscription;
import org.slf4j.Logger;
import org.slf4j.LoggerFactory;
import org.springframework.scheduling.concurrent.CustomizableThreadFactory;

import java.util.concurrent.ExecutorService;
import java.util.concurrent.Executors;

public class PublishOnWithSubscribeOnBoth {

    private static Logger logger = LoggerFactory.getLogger(PublishOnWithSubscribeOnBoth.class);

    public static void main(String[] args) {
        Publisher<Integer> publisher = subscriber -> {
            subscriber.onSubscribe(new Subscription() { 
                @Override
                public void request(long n) {
                    logger.debug("request()");
                    subscriber.onNext(1);
                    subscriber.onNext(2);
                    subscriber.onNext(3);
                    subscriber.onNext(4);
                    subscriber.onNext(5);
                    subscriber.onComplete();
                }

                @Override
                public void cancel() {

                }
            });
        };

        Publisher<Integer> subOnPub = subscriber -> {
            ExecutorService executorService = Executors.newSingleThreadExecutor(new CustomizableThreadFactory(){
                @Override
                public String getThreadNamePrefix() {
                    return "subOn-";
                }
            });

            executorService.execute(() -> publisher.subscribe(subscriber));

            executorService.shutdown();
        };

        Publisher<Integer> pubOnPub = subscriber -> {
            subOnPub.subscribe(new Subscriber<Integer>() {

                ExecutorService executorService = Executors.newSingleThreadExecutor(new CustomizableThreadFactory(){
                    @Override
                    public String getThreadNamePrefix() {
                        return "pubOn-";
                    }
                });

                @Override
                public void onSubscribe(Subscription s) {
                    subscriber.onSubscribe(s);
                }

                @Override
                public void onNext(Integer integer) {
                    executorService.execute(() -> {
                        subscriber.onNext(integer);
                    });
                }

                @Override
                public void onError(Throwable t) {
                    executorService.execute(() -> {
                        subscriber.onError(t);
                    });

                    executorService.shutdown();
                }

                @Override
                public void onComplete() {
                    executorService.execute(() -> {
                        subscriber.onComplete();
                    });

                    executorService.shutdown();
                }
            });
        };

        pubOnPub.subscribe(new Subscriber<Integer>() {
            @Override
            public void onSubscribe(Subscription subscription) {
                logger.debug("OnSubscribe");
                subscription.request(Long.MAX_VALUE);
            }

            @Override
            public void onNext(Integer integer) {
                logger.debug("onNext :{}", integer);
            }

            @Override
            public void onError(Throwable t) {
                logger.debug("onError:{}" , t);
            }

            @Override
            public void onComplete() {
                logger.debug("onComplete");
            }
        });
    }
}


이번편은 개요로써 간단히 기본 항목들에 대해서 알아보았다.


 Java 8 부터 시작해서 차근차근 알아보도록 하겠다. 


다음편 보기

'알아보기' 카테고리의 다른 글

0002 Reactive Programming 3  (0) 2019.12.08
0004 Reactive Programming 2  (0) 2019.12.05
0002 Realm 활용하기 2  (0) 2019.11.22
0002 Realm 활용하기 3  (0) 2019.11.22
0003 자바를 이용한 병렬 프로그래밍 1  (0) 2019.11.20

Reactive Programming

Block Chain

  • Block Chain 시작 1차 기본 개념 이해 및 정리 / 2019-12-08 / 진행 / < >

ReactJS

ReactNative

Electron

Realm

APR ( Apache Portable Runtime ) 구축하기 

Restful Web Services with React JS

Apache - Kafka

Apache Spark 

Apache Hadoop

Javascript ( ECMAScript 6 )

ReasonML

Progressive Web Apps

GraphQL

NodeJS

Machine Learning

Rabbit MQ

Java

Spring IO

Rust - https://rinthel.github.io/rust-lang-book-ko/

C인메모리 DB 만들어보기 

C++

C#

Web Assembly

Go


Docker

쿠버네티스 

프로메테우스

Scala

Kotlin

TensorFlow

Firebase

Jenkins

Xamarine

Cordova


Unity

Linux 

AWS 


  • 객체지향 프로그래밍 

    • 객체지향 설계 개발하기 

  • 소켓 프로그래밍

  • 자바로 테일 프로그래밍 

  • 큐 프로그래밍하기 

  • 비동기 I/O 개발하기

  • JVM 원리 

  • 네트워크

  • 보안 프로그래밍

  • 파서 개발하기 

  • 웹 소켓 프록래밍

  • XML 데이터 다루기 

  • 분산 트렌젝션

  • 암호화/복호화 

  • 직렬화 

  • 파일 입출력 처리 

  • 멀티 스레드

  • 제네릭 

  • Netty를 활용한 WebSocket 프로세스 

  • UDP를 이용한 채팅 프로그램

  • Pubsub Flow


화면 구성하기 


 본격적으로 App을 만들기 위해서 구성한 화면이다. Timer App을 아래와 같이 만들어봤다. 


Timer 상위 카테고리 
Timer 하위 카테고리 

위의 화면을 구성하기 위해서 React Native에서 기본적으로 배워야할 Layout 구성 방식을 보면, 


1. Layout with FlexBox 


  Flex는  내가 지정할 View를 지정가능한 공간에 대해서 얼마나 "채울수" 있는지 지정할 수 있다. 즉 비율로 상대적 크기를 설정할 수 있다. 


  Flex 값은 각각의 영역을 구분하는데 효과적으로 사용할 수 있는데,


  예를 들어 


    <View style={{flex : 1}} >

         <View style={{flex : 2}}></View>

         <View style={{flex : 3}}></View>

    </View>


   와 같은 레이아웃으로 구성되어 있다고 할 때, 


  가장 외부를 감싸고 있는 View의 높이를 기준으로 내부의 View는 각각 2/5 , 3/5의 높이를 가지게 된다. 


import React, { Component} from 'react';
import {
  View,
} from 'react-native';


class App extends Component {
  render(){
    return (
      <View style={{flex : 1, backgroundColor:"white"}} >
  
           <View style={{flex : 2, backgroundColor:"red"}}></View>
  
           <View style={{flex : 3, backgroundColor:'blue'}}></View>
  
      </View>
    );
  }
};

export default App;

위의 코드를 실제로 실행해보면 아래와 같이 영역이 구분되는 것을 볼 수 있다.      

2/5 , 3/5

여기에서 부모의 View를 크기 내에서 자식들의 View의 영역을 비율로 지정하는 것인데, 실제로 부모의 View의 크기를 조정하면 아래와 같이 조정할 수 있다. 

import React, { Component} from 'react';
import { View, } from 'react-native';

class App extends Component {
  render(){
    return (
      <View style={{ height:400, backgroundColor:"white" }} >
           <View style={{flex : 2, backgroundColor:"red"}}></View>
           <View style={{flex : 3, backgroundColor:'blue'}}></View>
      </View>
    );
  }
};

export default App;

강제로 View의 높이를 400으로 지정했을 때 내부의 View의 크기가 "상대적"으로 각각의 비율(2/5 , 3/5)에 따라 조정되었다. 


2. Flex Direction


 flexDirection은 각각의 하위 아이템들의 정렬 방향을 지정할 수 있다. 


   flexDirection : 'row' 로 지정되면, 행을 기준으로 정렬된다. 


<View style={{ flex :1, flexDirection : 'row', backgroundColor:"white" }} >
   <View style={{flex : 2, height : 60, backgroundColor:"red"}}></View>
   <View style={{flex : 3, height : 60, backgroundColor:'blue'}}></View>
 </View>


flexDirection : 'row'

    flexDirection : 'row-reverse' 로 지정되면 내부 아이템의 정렬이 반대로 적용된다. 


<View style={{ flex :1, flexDirection : 'row-reverse', backgroundColor:"white" }} >
           <View style={{flex : 2, height : 60, backgroundColor:"red"}}></View>
           <View style={{flex : 3, height : 60, backgroundColor:'blue'}}></View>
      </View>

row-direction : 'row-reverse'

     flexDirection : 'column' 으로 지정되면 내부 아이템이 세로로 위치된다.


class App extends Component {
  render(){
    return (
      <View style={{ flex :1, flexDirection : "column", backgroundColor:"white", marginTop : 100, backgroundColor : '#00ffff' }} >
           <View style={{height : 60, width : 60, backgroundColor:"red"}}></View>
           <View style={{height : 60, width : 60, backgroundColor:'blue'}}></View>
      </View>
    );
  }
};

flexDirection : 'column'

     flexDirection : 'column-reverse' 으로 지정되면 아이템의 정렬 순서 및 시작위치가 반대로 위치한다.

class App extends Component {
  render(){
    return (
      <View style={{ flex :1, flexDirection : "column-reverse", backgroundColor:"white", marginTop : 100, marginBottom :100, backgroundColor : '#00ffff' }} >
           <View style={{height : 60, width : 60, backgroundColor:"red"}}></View>
           <View style={{height : 60, width : 60, backgroundColor:'blue'}}></View>
      </View>
    );
  }
};

flexDirection : 'column-reverse'

3. Layout Direction


  Justity Content - 내부 아이템을 감싸는 Container를 기준으로 어떻게 정렬할 것인지를 지정할 수 있음 

import React, { Component} from 'react';
import { View, } from 'react-native';

class App extends Component {
  render(){
    return (
      <View style={{ flex :1, flexDirection : "column-reverse", justifyContent : 'space-around' , backgroundColor:"white", marginTop : 100, marginBottom :100, backgroundColor : '#00ffff' }} >
           <View style={{height : 60, width : 60, backgroundColor:"red"}}></View>
           <View style={{height : 60, width : 60, backgroundColor:'blue'}}></View>
           <View style={{height : 60, width : 60, backgroundColor:'yellow'}}></View>
           <View style={{height : 60, width : 60, backgroundColor:'green'}}></View>
           <View style={{height : 60, width : 60, backgroundColor:'purple'}}></View>
      </View>
    );
  }
};

export default App;


  Align Items - 내부 아이템을 감싸는 Continer의 가로축을 기준으로 어떻게 정렬할 것인지를 지정할 수 있음 

import React, { Component} from 'react';
import { View, } from 'react-native';

class App extends Component {
  render(){
    return (
      <View style={{ flex :1, flexDirection : "column-reverse", alignItems : 'center', backgroundColor:"white", marginTop : 100, marginBottom :100, backgroundColor : '#00ffff' }} >
           <View style={{height : 60, width : 60, alignSelf : 'flex-start', backgroundColor:"red"}}></View>
           <View style={{height : 60, width : 60, backgroundColor:'blue'}}></View>
           <View style={{height : 60, width : 60, backgroundColor:'yellow'}}></View>
           <View style={{height : 60, width : 60, backgroundColor:'green'}}></View>
           <View style={{height : 60, width : 60, backgroundColor:'purple'}}></View>
      </View>
    );
  }
};

export default App;

  Align Self  - 내부 아이템 각각의 정렬 어떻게 정렬할 지를 지정할 수 있고 만약 부모 Container에서 Align Item이 선언되어 있다면 해당 속성은 AlignSelf에 의해 무시된다. 

import React, { Component} from 'react';
import { View, } from 'react-native';

class App extends Component {
  render(){
    return (
      <View style={{ flex :1, flexDirection : "column-reverse", alignItems : 'center', backgroundColor:"white", marginTop : 100, marginBottom :100, backgroundColor : '#00ffff' }} >
           <View style={{height : 60, width : 60, alignSelf : 'flex-start', backgroundColor:"red"}}></View>
           <View style={{height : 60, width : 60, backgroundColor:'blue'}}></View>
           <View style={{height : 60, width : 60, backgroundColor:'yellow'}}></View>
           <View style={{height : 60, width : 60, backgroundColor:'green'}}></View>
           <View style={{height : 60, width : 60, backgroundColor:'purple'}}></View>
      </View>
    );
  }
};

export default App;

  Align Content - 횡축을 기준으로 분포를 정의하는데, 이는 flexWrap을 사용하는 다중 라인(줄)으로 감쌀때만 적용된다. 

import React, { Component} from 'react';
import { View, } from 'react-native';

class App extends Component {
  render(){
    return (
      <View style={{ flex :1, flexDirection : "column-reverse", flexWrap : 'wrap', alignContent : 'center', backgroundColor:"white", marginTop : 100, marginBottom :100, backgroundColor : '#00ffff' }} >
           <View style={{height : 60, width : 60, backgroundColor:"red"}}></View>
           <View style={{height : 60, width : 60, backgroundColor:'blue'}}></View>
           <View style={{height : 60, width : 60, backgroundColor:'yellow'}}></View>
           <View style={{height : 60, width : 60, backgroundColor:'green'}}></View>
           <View style={{height : 60, width : 60, backgroundColor:'purple'}}></View>
      </View>
    );
  }
};

export default App;

 Flex Wrap - 내부의 아이템의 Container의 사이즈를 벗어나는 것을 제어하고자 할 때 사용할 수 있다. alignContent는 아이템에 Container 영역을 넘어서서 다음칸으로 채워질 때 어떤 정렬로 채워지게 할 것인가를 정할 수 있다. 


 그외에도 


 flexGrow, flexShrink, flexBasis 등의 옵션이 존재한다. 


'따라해보기' 카테고리의 다른 글

0001 React Native App 개발기 6-1  (0) 2019.12.12
0001 React Native App 개발기 5  (0) 2019.12.08
0001 React Native App 개발기 3  (1) 2019.11.17
0001 React Native App 개발기 2  (0) 2019.11.15
0001 React Native App 개발기 1  (0) 2019.11.15

+ Recent posts